
WP Tabify: Transform a SharePoint Web Part Zone into Tabs
I do quite a bit of design and implementation on the SharePoint platform. Today, I created a very handy little script that I think might be something worth sharing. I don’t often post anything so specific on my blog, but I found this to be extremely useful, and I hope you do too.
What is it?
This all started with a great idea from the mind of Matthew Koon. If you’re not familiar with SharePoint, one thing you can do in the platform is place web parts on a page, which are akin to sidebar widgets in WordPress or other CMS platforms. Web parts have a lot of nifty drag-and-drop functionality, but the appearance of them is pretty much limited to what you can do with a bit of CSS and maybe some background images. The script that I created transforms a particular “web part zone,” which contains individual web parts, into a jQuery UI tab control. For each web part in the zone, you see an interactive “tab” instead of a boring static box. The contents of each tab is the contents of the web part, itself.
What does it do?
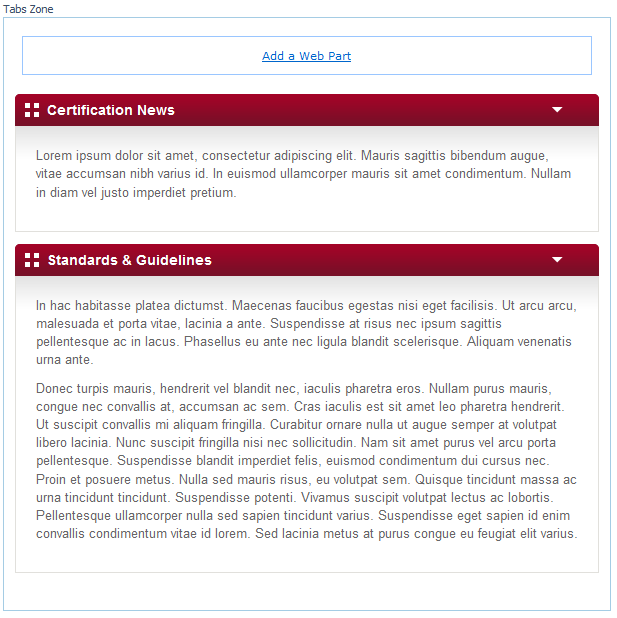
When you’re editing a page, you’ll see this:
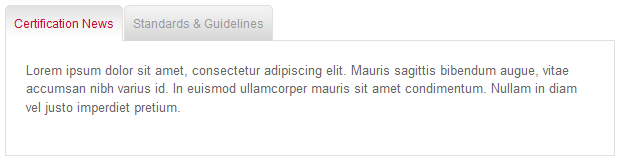
When you publish the page, you’ll see this:
1. Attach Required Scripts
You’ll need both jQuery 1.4.2 and jQuery UI 1.8.5 (or later).
<script type="text/javascript" src="http://ajax.googleapis.com/ajax/libs/jquery/1.4.2/jquery.min.js"></script>
<script type="text/javascript" src="http://ajax.googleapis.com/ajax/libs/jqueryui/1.8.5/jquery-ui.min.js"></script>
2. Attach the Script
Paste this into an attached JavaScript file:
(function($){
  $.fn.wpTabify = function(){
    if($('.ms-WPAddButton').size() == 0){
      return this.each(function(i){
        var tabList = $('<ul class="wpt-ui-tabs-nav"/>');
        var panels = $('<div class="wpt-ui-tabs-wrapper"/>');
        $(this).find('.s4-wpTopTable,td[id^="MSOZoneCell_"] > table').each(function(j){
          $(tabList).append('<li><a href="#ui-tab-panel' + i + j + '">' + $(this).find('h3.ms-WPTitle').text() + '</a></li>');
          var thisPanel = $('<div id="ui-tab-panel' + i + j + '" class="wpt-ui-tabs-panel"/>');
          var panelContents = $(this).detach();
          $(thisPanel).append($(panelContents).find('.ms-WPBody').html());
          $(panels).append(thisPanel);
        });
        if($(tabList).find('li').size() > 0){
          $(this).prepend(panels);
          $(this).prepend(tabList);
          $(this).tabs();
        }
      });
    }
    else{
      return false;
    }
  };
})(jQuery);
3. Wrap Your Web Part Zone
In your custom page layout, place a <div/> tag around a web part zone, and give it a class name or ID of your choosing.
<div class="my-web-part-tabs">
  <WebPartPages:WebPartZone id="zone1" runat="server" title="Tabs Zone"><ZoneTemplate></ZoneTemplate></WebPartPages:WebPartZone>
</div>
4. Run the Script
Now that you’ve attached the script, run it using a jQuery selector that matches the <div> you created in step three (above). This code also goes in an attached JavaScript file.
$(document).ready(function(){
  $('.my-web-part-tabs').wpTabify();
});
5. Add Some Style (Optional)
You may choose to add a bit of style to your newly tabified web parts (this is not specific to this plug-in, these are just some generic jQuery tabs styles):
.ui-tabs-nav {
    margin: 0;
    padding: 0;
}

.ui-tabs-nav li {
  list-style: none;
  margin: 0 1px 0 0;
  padding: 0;
  float: left;
}

.ui-tabs-nav a {
  position: relative;
  top: 1px;
  display: block;
  padding: 10px 8px;
  border: solid #e1e0dc;
  border-width: 1px 1px 0 1px;
  background: #d6d6d6;
  color: #999;
  text-decoration: none;
  -webkit-border-top-left-radius: 5px;
  -webkit-border-top-right-radius: 5px;
  -moz-border-radius-topleft: 5px;
  -moz-border-radius-topright: 5px;
  border-top-left-radius: 5px;
  border-top-right-radius: 5px;
}

.ui-tabs-nav li.ui-tabs-selected a {
  color: #c70d37;
  background: #fff;
}

.ui-tabs-panel {
  clear: both;
  padding: 20px;
  background: #fff;
  border: 1px solid #e1e0dc;
}

.ui-tabs-hide {
  display: none;
}
Compatibility
This has been tested in SharePoint 2007 and SharePoint 2010. Make sure to set your web part chrome to anything other than None, as my script relies on the web part title to display the tab title. Please let me know if you have any issues, as I will continue to update the script as needed. Good luck, and happy tabbing!