
Making <canvas> Games
In my last post, Making <canvas> Art, I introduced the idea of using the HTML5 <canvas> API to create a randomly-generated “northern lights” animation. The effect of the resulting animation is entirely aesthetic in nature. It provides no interactivity beyond the generation of new colors and shapes. In this follow-up post, we’ll use the same technique introduced in the original post, but extend our example to introduce keyboard input and manipulation in order to create a fully interactive game.
We’ll be creating a game I’m calling Space. It’s a simple game in which you use the keyboard to navigate a two-dimensional map of stars and planets. For the sake of brevity, the full script will be made available at the bottom of this post, and I’ll use snippets from the script to explain what’s what.
The game “loop”
The most important element of game development is the game “loop.” This is essentially a function that will continuously repeat as long as the game is being played. Our game loop will run much like our animation loop that we used in the previous post, with a few key additions. Without getting into too much detail, game loop script will look something like this:
<canvas id="space" width="400" height="300"></canvas>// game
function game(){
// configuration
var game = this;
game.canvas = document.getElementById('space');
game.ctx = game.canvas.getContext('2d');
game.time = false;
// initialize
game.init = function(){
// start the game loop
game.loop();
};
// game loop
game.loop = function(){
// timing
var now = new Date().getTime();
var d = now - (game.time || now);
game.time = now;
// update positions, view, etc.
game.update(d);
// render
game.render(d);
// request next frame
requestAnimationFrame(game.loop);
};
// update game
game.update = function(d){
// 1. update player position
// 2. update view
};
// render game
game.render = function(d){
// 1. clear the canvas
// 2. draw background
// 3. draw stars, planets
// 4. draw player
};
}
// begin game
var space = new game();
space.init();With this basic structure in place, we’ll start to add more specific features to our script to handle movement, animation, and player interaction.
The game view
The first challenge is creating a scrollable map on which players can move. Our map will contain objects like planets and stars, but not every star will be visible at any given time. Only those stars that are close to the player will be drawn on the canvas. This is made possible by creating a game view. Because this is a two-dimensional game, we can consider the game view according to x and y axes. It looks something like this:
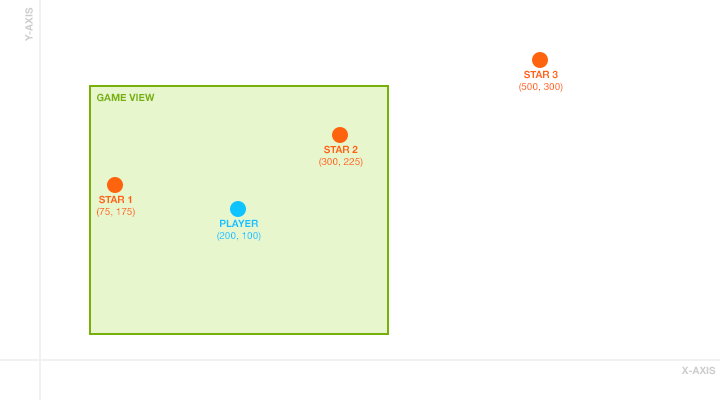
As you can see, stars 1 and 2 are visible within the game view, but star 3 is not. As the player moves around the map on the x and y axes, the view will be updated to show new map content, based on the location of the player. In our script, we can create the game view with the following additions to our game() function.
// configuration

game.width = 0;
game.height = 0;
game.view = { x: 0, y: 0 };

// resize canvas

game.resize = function(){
  game.ctx.canvas.width = game.canvas.width;
  game.ctx.canvas.height = game.canvas.width;
  game.width = game.canvas.width;
  game.height = game.canvas.width;
};
Using a combination of game.width, game.height, game.view.x, and game.view.y, we can keep track of our view and always draw the correct objects within the game canvas. As we add movement and objects to our map, we’ll refer back to our game view every time an object is rendered.
Stars, planets, and ships, oh my
With a basic animation and view structure in place, it’s time to populate our game world with the stars, planets, and ships that will make up the final game. It’s best to create a generic entity object that we can use to place all objects in our map. Our entities will store information for each map object, including its position (x and y), size (width and height), orientation, and movement vector.
// translate coordinates

game.translate = function(x, y){
  return {
    x: (game.width / 2) - game.view.x + x,
    y: (game.height / 2) - game.view.y + y
  }
};

// entity

game.entity = function(options){

  // settings

  var entity = this;
  entity.settings = {
    x: 0, // x position

    y: 0, // y position

    w: 20, // width

    h: 20, // height

    o: 0, // orientation

    v: { x: 0, y: 0 }, // vector

    f: 0.0004, // friction

    speed: 1,
    color: { red: 0, green: 0, blue: 0, alpha: 0 }
  };
  entity.settings = merge(entity.settings, options);

  // update

  entity.update = function(d){

    // update position

    entity.settings.x += (entity.settings.v.x / 10) * d;
    entity.settings.y += (entity.settings.v.y / 10) * d;

    // friction

    entity.settings.v.x -= entity.settings.v.x * entity.settings.f * d;
    entity.settings.v.y -= entity.settings.v.y * entity.settings.f * d;

  };

  // draw

  entity.draw = function(d){

    // only draw when in view

    if(entity.settings.x - (entity.settings.w / 2) <= game.view.x + (game.width / 2) && entity.settings.x + (entity.settings.w / 2) >= game.view.x - (game.width / 2) && entity.settings.y - (entity.settings.h / 2) <= game.view.y + (game.height / 2) && entity.settings.y + (entity.settings.h / 2) >= game.view.y - (game.height / 2)){

      // get translated coordinates

      var t = game.translate(entity.settings.x, entity.settings.y);

      // orientation

      game.ctx.save();
      game.ctx.translate(t.x, t.y);
      game.ctx.rotate(entity.settings.o * Math.PI / 180);

      // color

      game.ctx.fillStyle = 'rgba(' + entity.settings.color.red + ', ' + entity.settings.color.green + ', ' + entity.settings.color.blue + ', ' + entity.settings.color.alpha + ')';

      // draw entity

      game.ctx.beginPath();
      game.ctx.rect(0 - (entity.settings.w / 2), 0 - (entity.settings.h / 2), entity.settings.w, entity.settings.h);
      game.ctx.fill();

      // reset orientation

      game.ctx.restore();

    }

  };

};

// create player

game.player = new game.entity({
  x: 0,
  y: 0,
  w: 32,
  h: 40
});

// create a star at a random location

var star = new space.entity({
  x: Math.floor(Math.random()*5000)*(Math.round(Math.random())*2-1),
  y: Math.floor(Math.random()*5000)*(Math.round(Math.random())*2-1),
  w: 5,
  h: 5
});
The entity object will store all information we’ll need to draw objects on the game map. Entities will support position, orientation, and even movement using the v (vector) property. I’ve also included a friction property that will slowly reduce the movement vector over time, so that when players move around the map they don’t float away indefinitely.
To draw game entities in the correct position, we’re using a translate() function to convert our map-relative x and y coordinates into view-relative coordinates. Using this in conjunction with an if statement that checks to see if the entity is currently “in view,” we can draw our game objects only when they appear near the player.
Images and animation
Currently, our game entities can be rendered only as simple rectangles on our game map. Instead of rectangles, we want to use images and even animations to bring our game content to life. We can add this support to our game entities using animation sprites, a common technique used in game development. Our game objects will be rendered using images such as the following image of our player ship.

This single image contains frames that make up the different states of our object. From left to right, the first frame is the static state of our ship, followed by two forward thrust frames, followed by two reverse thrust frames, and finally followed by two turbo frames. We can improve our script by adding support for these sprite animations.
// load images

game.resources = [];
game.load = function(images){

  // load image from url

  var loadFromUrl = function(url){
    var img = new Image();
    img.src = '/path/to/images/' + url + '.png';
    game.resources[url] = { image: img, loaded: false };
    img.onload = function(){
      game.resources[url].loaded = true;
    };
  };

  // accept array or single resource

  if(images instanceof Array){
    for(var i = 0; i < images.length; i++){
      loadFromUrl(images[i]);
    }
  }
  else{
    loadFromUrl(images);
  }

};

// sprites

game.sprite = function(options){

  // settings

  var sprite = this;
  sprite.settings = {
    image: false,
    alpha: 1,
    x: 0,
    y: 0,
    w: 0,
    h: 0,
    speed: 0.02, // .001 = 1 frame/second

    frames: [],
    index: 0,
    dir: 'horizontal',
    loop: true
  };
  sprite.settings = merge(sprite.settings, options);

  // update

  sprite.update = function(d){
    sprite.settings.index += sprite.settings.speed * d;
  };

  // draw

  sprite.draw = function(x, y, w, h){

    // determine which frame to draw

    var frame = 0;
    if(sprite.settings.speed > 0){
      var max = sprite.settings.frames.length;
      var idx = Math.floor(sprite.settings.index);
      frame = sprite.settings.frames[idx % max];
      if(!sprite.settings.loop && idx > max){
        var frame = sprite.settings.frames[sprite.settings.frames.length - 1];
      }
    }

    // set new position

    if(sprite.settings.dir == 'vertical'){
      sprite.settings.y = frame * sprite.settings.h;
    }
    else{
      sprite.settings.x = frame * sprite.settings.w;
    }

    // render

    game.ctx.drawImage(sprite.settings.image, sprite.settings.x, sprite.settings.y, sprite.settings.w, sprite.settings.h, x, y, w, h);

  };

};

// load images

game.load([
  'ship',
  'star-small',
  'star-large'
]);

// add sprites to player

game.player.settings.sprites['rest'] = new game.sprite({
  image: game.resources['ship'].image,
  w: 32,
  h: 40,
  frames: [0],
  speed: 0
});
game.player.settings.sprites['forward'] = new game.sprite({
  image: game.resources['ship'].image,
  w: 32,
  h: 40,
  frames: [1, 2]
});
game.player.settings.sprites['reverse'] = new game.sprite({
  image: game.resources['ship'].image,
  w: 32,
  h: 40,
  frames: [3, 4]
});
game.player.settings.sprites['boost'] = new game.sprite({
  image: game.resources['ship'].image,
  w: 32,
  h: 40,
  frames: [5, 6]
});
The game.sprite() object allows us to quickly specify a width, height, speed, and direction of our sprite image. Using this function, we can extend our entity() object to include support for sprite images. The game.load() function handles image loading, so that we can preload images before the game begins.
Keyboard interaction
The final addition to our game script is keyboard interaction. With game development, it’s much easier to keep track of both the keyup and keydown events independently. I prefer to create an array of keycodes that can be checked at any time in our script to see if that particular key is currently pressed. We can do this with an addition to our game script:
// keyboard

game.keys = [];
game.keydown = function(e){
  game.keys[e.keyCode] = true;
};
game.keyup = function(e){
  game.keys[e.keyCode] = false;
};

// listen

window.addEventListener('keydown', game.keydown, false);
window.addEventListener('keyup', game.keyup, false);
This function allows us to keep track of every keyboard event. For example, if we want to know at any time if the left-arrow-key is depressed, we can check game.keys[37], which will return true when depressed, and false or undefined when otherwise. We can put this to good use by running a new function every time our game.update() is executed.
game.keypress = function(d){

  // boost

  var boost = 1;
  if(game.keys[16]){
    boost = 3;
  }

  // thrust

  if(game.keys[40]){
    game.player.settings.v.x += Math.cos((game.player.settings.o - 270) * Math.PI / 180) * 0.002 * game.player.settings.speed * d;
    game.player.settings.v.y += Math.sin((game.player.settings.o - 270) * Math.PI / 180) * 0.002 * game.player.settings.speed * d;
    game.player.settings.status = 'reverse';
  }
  else if(game.keys[38]){
    game.player.settings.v.x += Math.cos((game.player.settings.o - 90) * Math.PI / 180) * 0.004 * (game.player.settings.speed * boost) * d;
    game.player.settings.v.y += Math.sin((game.player.settings.o - 90) * Math.PI / 180) * 0.004 * (game.player.settings.speed * boost) * d;
    game.player.settings.status = 'forward';
    if(game.keys[16]){
      game.player.settings.status = 'boost';
    }
  }

  // rotate

  if(game.keys[37]){
    game.player.settings.o -= (0.15 / boost) * d;
    if(game.player.settings.o < 0){ game.player.settings.o = 360 - game.player.settings.o; } else if(game.player.settings.o > 360){
      game.player.settings.o = 0 + game.player.settings.o;
    }
  }
  if(game.keys[39]){
    game.player.settings.o += (0.15 / boost) * d;
    if(game.player.settings.o < 0){ game.player.settings.o = 360 - game.player.settings.o; } else if(game.player.settings.o > 360){
      game.player.settings.o = 0 + game.player.settings.o;
    }
  }

};
This last piece of our script allows users to manipulate the player object’s orientation, movement vector, and speed using the arrow keys. This allows users to rotate their ship and move about the game world. We’ve even added a speed boost when the shift key and the up arrow are pressed at the same time.
The final product
With a bit of tweaking, we’ve added hundreds of randomly placed stars and planets to our game, creating a small two-dimensional world that we can explore in our ship. Try it out using the arrow keys on your keyboard.
You can download the source code and play the game full screen at http://oldrivercreative.com/space/.